“Know Thyself”: Elementary Self-Portrait Ideas

IMG_0482

Happy Fall, y’all!

Thought I’d post a bit about the student projects going on in my art classes.  Each year for our first big project I start off with self-portraits in every elementary grade, from kindergarten all the way to fifth.  (This year I heard the word “selfie” a lot in our discussions of self-portraits!)

Why, you may ask, would I have kids make self-portraits multiple times?  Why would I give every grade the same project?  When I first started teaching, I found the idea of “progressive” self-portraits over time on the Incredible Art Department website (scroll down to the lesson by Judy Decker).  She has students in each grade make a self-portrait on 9×12 paper and saves them in a portfolio until, at 5th grade graduation, she displays all six self-portraits together for students to see and reflect upon.  I loved this idea!  At the private school where I teach, however, we have lots of kids that don’t stay all the way through the elementary grades (and we don’t have an official fifth grade graduation, since our school goes up to 12th grade), so I just send home the portraits each year and encourage parents to save them to look back on later.  I also make sure we do the self-portraits in a completely different way each year, focusing on different artists for our inspiration and using a variety of materials and techniques from grade to grade.

I encourage students to think about what a self-portrait can tell others about the artist and to represent who they are at this particular moment in time.  We talk about how we grow and change from one grade to the next, not just in physical appearance but in terms of our interests and goals, as well as in our artistic abilities as we practice and acquire new skills.  We look at self-portraits by Rembrandt, Judith Leyster, Picasso, Frida Kahlo, Chuck Close, Warhol, and lots of others.  This is a fun YouTube video I found (posted by Blake Prim) that gives a quick run-through of some of the most famous self-portraits.  Often when I tell the kids that we’re going to start on self-portraits I hear “Yesss!”  It seems to build confidence to have some familiarity with drawing themselves from previous years.

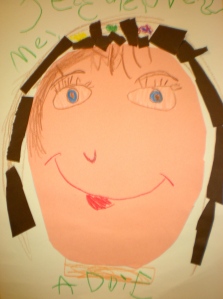
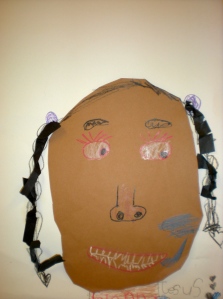
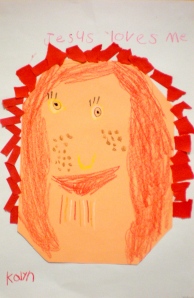
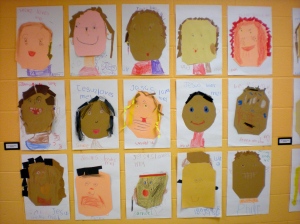
Kindergarten: This year we made cut- and torn-paper face collages.  So cute!  I found the idea here.  I buy the 9×12 “multicultural” construction paper packs that come in a variety of skin tones from pale peach to tan to dark brown, and I encourage the kids to try to pick a paper that they think looks like a close match to them.  We talk about the beauty of our differences and how God created each of us to be unique and special.  First, they try to round out the construction paper by cutting off the four corners.  (Some end up shaped like potatoes, but these are the most adorable.)  Students observe themselves in mirrors and then draw their features with construction paper crayons (I always do a quick demo. and remind them not to forget ears, eyebrows, noses, etc.).  The following week they finish up and also cut or tear paper scraps for hair.

DSCN3264  DSCN3262 DSCN3327  DSCN3323

I enjoy seeing the portraits all together on the wall!  Soon after students all finish their self-portraits, we have a huge Grandparents’ Day event, and the grandparents love seeing their grandchild’s artwork.  In my next post I’ll share what we did in the older grades.  Art teachers, what ideas do you use for self-portraits?
Etsy beginnings

DSCN2750

For all of the artists and entrepreneurial spirits out there, I’m sure you’ll know what I mean.  I had a desire to create, an urge to put something out there for people to see and enjoy and hopefully buy.  I wanted to challenge myself to make work that there was an actual market for…but I didn’t always have a clear vision about what exactly to make and market.

For years, I’ve painted and sold my paintings here and there.  I took portrait commissions, painted murals, had some work in a gallery, rented a booth at a few festivals and art fairs…  One year, my friend and I had prints made of our work and even had a booth at the Texas Renaissance Faire!  (Not my best idea ever, but it was definitely an interesting few weeks!)  I paid a lot of money to have a website professionally made to show my portfolio, but the few sales that came from my website barely paid the maintenance fees…  and then I heard about Etsy.

I know there are some out there that scoff at the nature of some of the items sold on Etsy.com (and yes, you can find some odd things out there, along with all the beautiful handmade items), but for me Etsy has been a huge blessing.  I had LOTS of prints left over from my unsuccessful run at the Renaissance Faire, so I thought, why not try posting a few items and see if they sell?  I created an Etsy shop, “MerrilysLittleShop”, and started posting my art prints.  At first, I checked the “shop stats” every day and was disappointed; very few people were clicking on my site.  But over time, the numbers grew very gradually…and then a couple of prints sold!  It still wasn’t much, but soon I was getting more traffic than I had on my expensive website, so I let the website go.

Though I had been listing my prints on Etsy, I hadn’t created anything new in awhile.  For about two years, while teaching elementary art full-time, I went back to grad school and spent all my spare time on my own homework.  When I finally finished my Masters in 2012, I was desperate to create–I even tried making floral hair pieces, flower girl baskets, necklaces made of antique brooches, Christmas wreaths…I just had the urge to MAKE THINGS!  My husband would come home to find me sitting on the floor with a hot glue gun, surrounded by sticks and yarn, or whatever I was working with that day.

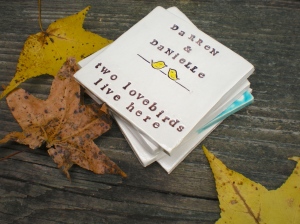
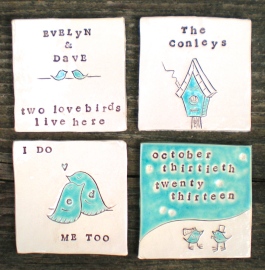
While teaching elementary art, I had become much more interested in clay.  I bought a bag of clay and some glazes to play around with at home, and I made a couple of ceramic plates covered with flower petals.  Then in March 2013, my husband’s cousin was getting married, and I needed a gift for her bridal shower.  The idea just sort of came to me…coasters…personalized for her wedding?…  In my kitchen, I rolled out slabs of clay with a rolling pin and played around with some rubber letter stamps (which I had last used to stamp names on wrapping paper at Christmas) and stamped the bride and groom’s first names, last name, initials, and wedding date.  I had no number stamps, so I stamped the date out in words.  I incorporated the theme of “two lovebirds” and used a needle tool to carve birds in various sizes and styles, adding a birdhouse.  I took the coasters to my school and (with my principal’s permission) put them in the kiln with my students’ work.  After glazing and firing again, I added some felt on the bottom and wrapped them up.

One of my first ceramic creations

One of my first ceramic creations

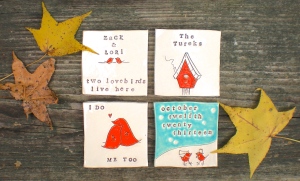
I was kind of nervous at the wedding shower, but to my happy surprise, the coasters were a hit!  I had glazed them with an aqua blue to match the dishes on the bride’s registry, and she was thrilled.  Someone suggested that I should try to sell sets of these coasters.  So, I took photos and added the listing to my Etsy shop.  Soon the “shop stats” numbers were creeping up, and I had my first sale–to someone in the UK!  Day by day, I sold more and more sets of personalized coasters.  The coasters changed a bit as I grew better at stamping and carving.  I bought my own small kiln for home, and then I had to buy a second kiln and a slab roller.  My house now looks like a factory, I’m always covered with clay dust, and I don’t have as much free time as I used to, but I pray that my Etsy shop will continue to grow as I add new things.

My first set of coasters

My first set of coasters

A more recent set

A more recent set

Do you have the irresistible urge to make?  Just start making something–anything!  Necessity is the mother of invention…what occasion do you have coming up for which you can *make* a gift rather than buy one?  Recently I showed my fifth-graders a video clip of the artist Chuck Close… I love his advice to his younger self: “Inspiration is for amateurs.  The rest of us just show up and get to work.  Every great idea I’ve ever had grew out of work itself.  Sign on to a process and see where it takes you.”

An introduction

DSCN2748

Hi, I’m Merrily.  I have from time to time toyed around with the idea of a blog…  I love the idea of sharing creative thoughts, project ideas, business strategies, teaching strategies, and images of finished products with other creative folks out there (and hopefully finding new ideas in return).  I teach elementary art (K-6) at a private Christian school, and in my “spare” time I’ve also started an Etsy business selling handbuilt ceramic items, mostly stamped coasters that I personalize for weddings and other occasions (hence “The Coaster Cottage”).  The cottage part is still to come.  (Right now my husband and I live in a small townhouse, but his side business is farming.  He grows the best strawberries ever, by the way.  One day we’re planning to move out to the farm, and the cottage part will be a reality!  For now, I collect Pinterest pictures of all things shabby chic and farmhouse cottage and just dream….)

This (the 2014-15 school year) is my seventh year teaching, and I thought I’d start out by sharing how God brought me into teaching art, since my hope for this blog is ultimately to glorify Him in some small way.  I’m not a planning type of person by nature…  Ten years ago I majored in studio art and art history, but I didn’t know what exactly I would do after college.  I found a job in an art gallery, and eventually I made the brave, foolish decision (for me, at least) to just try to make it by selling my paintings.  Barely scraping by, I moved back in with my parents.

Not sure what direction to take, I went to real estate school and became a Realtor (in 2008, just as the housing market crashed).  As I was struggling to make a sale, I met with a former college professor, asking for advice on possibly getting a degree in art education.  I also applied to an HR position in a random company, just looking for anything.  Meanwhile, since I had a somewhat flexible schedule, I was able to take a week with some friends from my church and volunteer at an awesome camp that ministers to kids who are or have been in the foster care system.  One day of camp I had to make the two hour drive home to show a house to someone, and while driving back to camp, I called to see if the HR position had been filled.  It had.  Feeling desperate and discouraged, I said out loud in the car, “Lord, I surrender this to you.  You’ll have to show me whatever job you have for me.”

Back at camp the same day, two or three hours later, I was chatting with some of the staff and counselors, when one of them said, “Just curious–how many of us here are teachers?”  (Most there were…they were able to use some of their summer break to be at camp.)  I said, “I’m not a teacher, but I’ve thought I might like to teach art.”  Someone said, “You should check with the camp director; she needs an art teacher at her school!”  (The camp director happens to be the principal at the school where I now teach.)  I remember being stunned, knowing this was not a coincidence but God answering my prayer in a way that I would not be able to doubt.  And…the rest is history!  I was hired even without a teaching degree, but as I taught I went back to school and got my Masters in elementary education.  God is good, in the small details and in the big.

 “Come to me, all you who are weary and burdened, and I will give you rest.  Take my yoke upon you and learn from me, for I am gentle and humble in heart, and you will find rest for your souls.  For my yoke is easy and my burden is light.” (Matthew 11:28-30)

I didn’t really intend this first post to be so long or to go in this direction, but I’m glad it did…  It has been a good reminder to me; to surrender my cares to the Lord is not just a one time event but something to do over and over.  Maybe this can be of encouragement to someone out there.